Blog

  • How to delete a PVE Node in 2-Node Proxmox Cluster

    How to delete a PVE Node in 2-Node Proxmox Cluster

    Managing a Proxmox Virtual Environment (PVE) cluster can sometimes require removing a node, especially in a small 2-node setup. This guide will walk you through the steps to safely delete a node from your Proxmox cluster.

    Prerequisites

    Before you begin, ensure you have:

    • Administrative access to the Proxmox cluster.
    • Important: Moved all virtual machines (VMs) and containers (LXCs) from the node you want to remove, using Migrate feature in the proxmox cluster. Delete all VMs/LXCs that you don’t need to use anymore. If you don’t move or delete all VMs/LXCs in the node then after delete node, these VMs/LXCs will remain appear in the web GUI after deleting node (see Step 4 to solve this).
    • Backed up any important data.

    Steps to Remove a Node

    1. Power Off the Node: First, power off the node you want to remove by using the web GUI or SSH to the server and run poweroff command. This ensures that it won’t interfere with the cluster during the removal process. As noted earlier, it’s essential to turn off the node before removing it and ensure it doesn’t restart with its current settings within the cluster network. If you power it on without adjustments, it could disrupt the cluster and make it challenging to restore functionality.
    ssh root@<node-to-remove>poweroff
    1. Adjust Expected Votes: Since you have a 2-node cluster, you need to adjust the expected votes to maintain quorum. Run the following command on the remaining node:
    pvecm expected 1

    This command sets the expected votes to 1, allowing the cluster to function with a single node temporarily.

    1. Delete the Node: Use the pvecm delnode <node-name> command to remove the node from the cluster. Replace <node-name> with the name of the node you want to delete, for example: pvecm delnode pve2
    pvecm delnode pve2

    This command updates the cluster configuration and removes the node.

    1. Clean Up Configuration Files: If the node still appears in the Proxmox GUI, you might need to manually remove its configuration files. On the remaining node, delete the directory corresponding to the removed node:
    rm -rf /etc/pve/nodes/<node-name>

    The output should no longer list the removed node.

    1. Verify the Removal: Check the cluster status to ensure the node has been successfully removed:
    pvecm status

    The output should no longer list the removed node.

    Conclusion

    Removing a node from a 2-node Proxmox cluster requires careful steps to maintain cluster integrity. By following this guide, you can safely delete a node and ensure your cluster continues to operate smoothly. Always remember to back up your data and verify each step to avoid any disruptions.

    If, for whatever reason, you want the removed server to join the same cluster again, you have to:

    • Do a fresh install of Proxmox VE on it,
    • Then join it.

    I hope this helps! If you have any further questions or need additional assistance, feel free to share your experiences or ask questions in the comments below! 😊
  • Step-by-Step Guide to Install OpenMediaVault on Proxmox and Enabling SMB Share

    Step-by-Step Guide to Install OpenMediaVault on Proxmox and Enabling SMB Share

    In the realm of home servers and virtualization, having a reliable platform to manage storage and network services is crucial. OpenMediaVault (OMV) and Proxmox Virtual Environment are two powerful tools that, when combined, create a robust environment for managing storage and virtual machines (VMs).

    OpenMediaVault represents the latest in network-attached storage (NAS) solutions, built upon Debian Linux. It comes pre-loaded with essential services such as SSH, (S)FTP, NFS, SMB/CIFS, RSync, and more, all readily accessible. Its modular framework allows for seamless expansion through plugins. While initially tailored for small offices or home offices, OpenMediaVault’s versatility extends beyond these environments. It offers a straightforward, user-friendly setup, making it accessible to anyone looking to install and manage NAS without extensive technical expertise.

    In this guide, we’ll walk through the process of installing OpenMediaVault on Proxmox and setting up an SMB share for easy file sharing across your network.

    Step 1: Download OpenMediaVault Installation ISO and Upload to Proxmox

    Before you begin setting up Proxmox Virtual Environment, you’ll need to acquire the OpenMediaVault installation ISO and make it available for deployment on your Proxmox server. Here’s how to get started:

    1. Download OpenMediaVault ISO: Visit the OpenMediaVault official download page to obtain the latest installation ISO. Choose the appropriate version depending on your hardware and requirements.
    2. Upload ISO to Proxmox: Access the Proxmox web interface using your browser. Navigate to “Storage” on the left sidebar and select the storage location where you want to upload the ISO file (e.g., local storage, NFS, or other storage types configured on Proxmox).
    3. Upload ISO File: Click on “Upload” and select the OpenMediaVault ISO file from your local machine. Wait for the upload to complete, ensuring the ISO is available in your chosen storage location within Proxmox.

    Step 2: Create a Virtual Machine for OpenMediaVault

    1. Login to Proxmox: Access the Proxmox web interface using your browser by navigating to the IP address of your Proxmox server.
    2. Create New VM: Click on “Create VM” and follow the wizard to set up a new virtual machine for OpenMediaVault.
      • Choose “Linux” and “Debian” as the OS type and version respectively.
      • For the OS: select OMV ISO to the VM’s CD/DVD drive to boot from it.
      • Allocate sufficient resources (CPU cores, RAM, disk space) based on your anticipated usage. In my case, I set the CPU cores to 1; RAM is 2048 MB; disk space is 128GB.
    3. Storage Configuration: Attach the addition hard disks or USB to use as storage. In my case, because I install OMV as a VM inside Proxmox on a mini PC, I just add an USB disk enclosure with 1TB laptop HDD.
    4. Networking: Assign network settings to the VM so it can connect to your network.
    5. Start the VM: Once configured, start the VM and proceed with the OMV installation.

    Step 3: Install OpenMediaVault

    1. Install OpenMediaVault:
      1. Once the OMV installer boots up, select your preferred language and proceed with the installation process.
      2. Follow the on-screen prompts to configure network settings, timezone, and partitioning options.
    2. Access Web Interface: Once installed, access OMV’s web interface by navigating to the VM’s IP address on port 80 (http://<ip_address>).
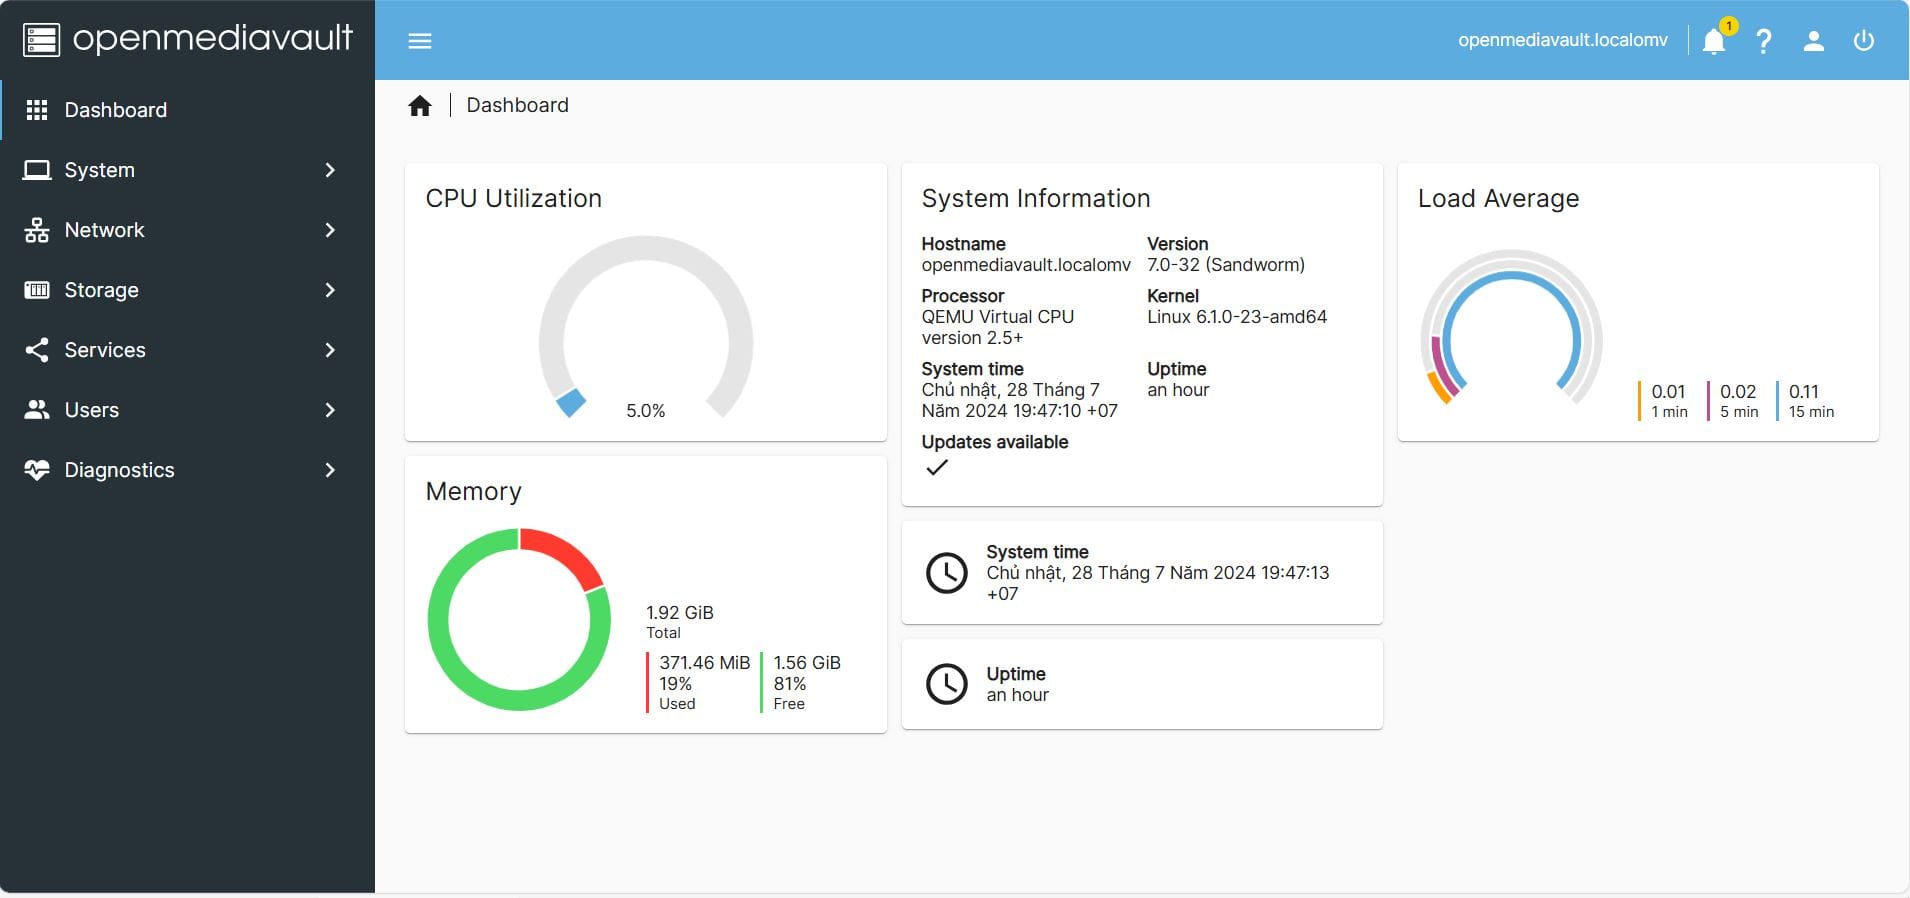
    OpenMediaVault dashboard

    Step 4: Configure OpenMediaVault

    1. Initial Setup: Log in using the default credentials (admin / openmediavault) and change the password if needed.
    2. Network: Go to Network -> Interface to set OMV to static IP address. I recommend setup OMV to use static IP using your modem LAN configuration.
    3. Storage:
      1. Navigate to “Storage” -> “Disks”, select the disk to use and click Wipe to delete the entire disk if needed. Be careful because this all the data on this disk will be lost.
      2. Navigate to “Storage” -> “File Systems” -> “Create” to create a new file system on your storage devices. Wait for the process to finish then the screen automatically change to Mount screen. Just choose the created filesystem and Type (I choose EXT4 for Type), then click Save -> Apply.
    4. Share Folders: Go to “Shared Folders” and create a new shared folder. Set permissions and other settings as needed (I just use the default settings and permissions).

    Step 5: Enable SMB/CIFS Share

    1. Configure SMB/CIFS: Go to “Services” -> “SMB/CIFS” -> “Settings” and enable the service.
    2. Configure the share: Go to “Services” -> “SMB/CIFS” -> “Shares” and add the previously created shared folder.
    3. Set Permissions: Adjust permissions and access rights under the “Access Rights Management” tab within SMB/CIFS settings.

    Step 6: Create a new user

    Go to “Users” -> “Users” to create a new user.

    Step 7: Access and Test the SMB Share

    1. Access the Share: On your networked devices (Windows, macOS, Linux), navigate to \<OMV_IP_address>\ to access the SMB share. Log in using the credentials you set up in the SMB/CIFS settings (or using the user created in Step 6).
    2. Test File Transfer: Transfer a file to and from the SMB share to ensure everything is functioning correctly.

    Video guide

    Conclusion

    Setting up OpenMediaVault on Proxmox and configuring an SMB share provides a versatile solution for managing storage and sharing files across your network. By following these steps, you can create a stable and efficient home server environment that meets your storage and file-sharing needs. Experiment further with additional plugins and features offered by OpenMediaVault to customize your setup even more. Enjoy your newly configured home server and the flexibility it brings to your network!

  • Implementing a 3-2-1 Backup Strategy for Your Homelab

    Implementing a 3-2-1 Backup Strategy for Your Homelab

    In the world of data security, the 3-2-1 backup strategy is a golden rule for safeguarding your digital assets. This approach ensures that you have multiple copies of your data, on different media, and with one copy offsite. For homelab enthusiasts, implementing this strategy can be a game-changer in protecting your valuable data from accidental loss, ransomeware or catastrophic events.

    Understanding the 3-2-1 Rule

    The 3-2-1 backup strategy is simple yet effective:

    • 3 copies of your data
    • 2 different storage mediums
    • 1 copy stored offsite

    This affordable 3-2-1 backup solutions for home users method is designed to provide a robust safety net against data loss. Let’s break down how to apply this strategy in a homelab environment with Step-by-step guide to setting up a 3-2-1 backup system as below.

    Advantages of the 3-2-1 backup strategy in data protection

    The 3-2-1 backup strategy offers several advantages in data protection, ensuring that data remains safe, secure, and accessible in various scenarios. Here are the key advantages:

    1. Redundancy: The 3-2-1 strategy provides multiple copies of data, reducing the risk of data loss. With three copies, there are always backups available if one fails.
    2. Diverse Storage Media: Storing backups on two different types of media (e.g., internal hard drive, external hard drive, and cloud storage) mitigates the risk associated with a single type of storage failure.
    3. Offsite Backup: Keeping one backup offsite protects against local disasters such as fire, flood, or theft. This ensures data can be recovered even if the primary location is compromised.
    4. Comprehensive Data Protection: This strategy covers various failure scenarios, including hardware failure, software corruption, and human error. It ensures that at least one copy of the data is always recoverable.
    5. Easy Recovery: With multiple backups, the recovery process is quicker and more reliable. If one backup is corrupted or unavailable, another copy can be used.
    6. Scalability: The 3-2-1 strategy is scalable and can be adapted as data storage needs grow. Additional backups and diverse media types can be incorporated as necessary.
    7. Compliance and Regulation: For businesses, the 3-2-1 backup strategy helps meet regulatory requirements for data protection and disaster recovery, ensuring compliance with industry standards.
    8. Cost-Effective: By utilizing a mix of storage media, including cost-effective options like external hard drives and cloud storage, the 3-2-1 strategy can be implemented without significant financial investment.
    9. Peace of Mind: Knowing that data is backed up in multiple locations provides peace of mind, reducing anxiety over potential data loss and enabling focus on other critical tasks.
    10. Resilience Against Ransomware: The offsite backup component is particularly effective against ransomware attacks, as it ensures that a clean copy of the data is available even if local files are encrypted.

    Step-by-step guide to setting up a 3-2-1 backup system

    Step 1: Creating Three Copies of Your Data

    Your first copy is the original data on your primary system. The second and third copies are backups. For the homelab, consider using virtualization backup platforms like Proxmox Backup Server, Veeam, Nakivo, or Vembu. These tools can automate the backup process, ensuring that you always have up-to-date copies of your data.

    Step 2: Using Two Different Storage Mediums

    The key here is diversification. You might have one copy on a local NAS and another on an external hard drive or a different RAID array within the same server. This approach protects against hardware failure affecting all copies simultaneously.

    Step 3: Storing One Copy Offsite

    Offsite storage is crucial for disaster recovery. There are several offsite storage options for a 3-2-1 backup strategy. Cloud storage is a popular choice for the offsite copy, providing remote access and additional security. Services like Backblaze or AWS can be integrated into your backup strategy. We also can use external hard drives in a 3-2-1 backup plan.

    Best practices for 3-2-1 data backup and recovery in a Homelab

    1. Local Backups: Use your backup software to create regular snapshots of your data. Store these on a NAS or a dedicated backup server within your homelab.
    2. Backup Copies: Create additional copies of your backups. If you’re using a converged model, store these on a different RAID array in the same server.
    3. Offsite Backups: Leverage cloud storage for the third copy. Ensure that your cloud provider offers encryption and secure access to protect your data.
    4. Testing: Regularly test your backups to ensure they can be restored successfully. This step is often overlooked but is critical to your backup strategy’s effectiveness.
    5. Automation: Automate as much of the process as possible. Schedule backups during off-peak hours and use scripts to manage offsite uploads. You also can easily find a lot of posts guide how to automate your 3-2-1 backup process.
    6. Documentation: Keep detailed records of your backup procedures, schedules, and recovery processes. This documentation will be invaluable during a disaster recovery scenario.

    Conclusion

    Implementing a 3-2-1 backup strategy in your homelab requires careful planning and execution. By following these steps, you can ensure that your data remains safe and recoverable, no matter what challenges arise. Remember, the goal is not just to back up your data but to do so in a way that maximizes its availability and integrity. Happy backing up!

    Would you like more detailed guidance on any specific part of the 3-2-1 backup strategy for your homelab? Feel free to contact us!

  • How to Change Proxmox Management IP Address

    How to Change Proxmox Management IP Address

    Changing the management IP address of your Proxmox server is a common task that may be necessary when moving your server to a new network or reorganizing your existing network. This blog post will guide you through the steps to successfully change the Proxmox management IP address.

    Understanding Proxmox Network Configuration

    Before proceeding with the IP address change, it’s important to understand that Proxmox uses a static IP address setup by default. This IP address is used to access the web management interface on port 8006.

    Remember to perform these actions during a maintenance window or when it’s convenient, as network changes can temporarily disrupt access to the Proxmox server.

    Step-by-step guide to change the Proxmox Management IP Address

    Step 1 – Access the Proxmox Server: Log in to your Proxmox server via SSH or directly through the console.

    Step 2 – Edit Network Configuration: Use a text editor like nano to edit the /etc/network/interfaces file. This file contains the network configuration for your Proxmox server.

    nano /etc/network/interfaces

    Step 3 – Locate the Current IP Configuration: Find the section in the file that corresponds to your management network interface, usually labeled as eth0.

    auto eth0iface eth0 inet static    address 192.168.1.100    netmask 255.255.255.0    gateway 192.168.1.1

    Step 4 – Update the IP Address: Change the address line to your new desired IP address. If you are changing the subnet, you will also need to update the netmask and gateway.

    Step 5 – Save the Changes: After making the necessary changes, save the file and exit the text editor (in nano, you can do this by pressing Ctrl+X, then Y, and then Enter).

    Step 6 – Restart the network service: Apply the changes by restarting the network service. This can be done using the following command:

    systemctl restart networking

    Step 7 – Verify the changes: Confirm that the IP address has been updated by checking the network interface configuration with below command. Replace eth0 with the actual network interface name if it’s different:

    ip addr show eth0

    Step 8 – Edit the Hosts File: Update the /etc/hosts file with the new IP address to ensure that the Proxmox server can correctly resolve its own hostname

    nano /etc/hosts

    Step 9 – Reboot the Server: Once all changes are made, reboot the Proxmox server to apply the new network configuration if needed:

    reboot now

    Step 10 – Verify the Changes: After the server reboots, verify that you can access the Proxmox web interface using the new IP address.

    Step 11 – Update IP of VMs, LXC and other services: If needed, you have to change IP of proxmox virtual machines, lxc containers and other services. For example, in my case, I have to update IP address of OPNsense VM, and update it’s gateway address by go to OPNsense management web GUI -> System -> Gateway -> Configurations to change these parameters:

    Update OPNsense Gateway IP address

    Conclusion

    Changing the management IP address of your Proxmox server is a straightforward process that involves editing a couple of configuration files and rebooting the server. Always ensure that you have a backup of your configuration files before making changes, and verify that the new settings are working as expected.

    Remember, this guide focuses on changing the management IP address and does not cover changes to the IP addresses of virtual machines or containers hosted on the Proxmox server. For more detailed instructions or if you encounter any issues, consider watching tutorial videos or reading comprehensive guides available online.

    Happy virtualizing!

  • Key Considerations for Building an Efficient and Reliable Home Lab

    Key Considerations for Building an Efficient and Reliable Home Lab

    Building a home lab can be an exciting and rewarding project, but it’s crucial to avoid common pitfalls. Here are five important things to consider before you start:

    1. Power Draw and Noise

    When purchasing equipment, especially from eBay or other online marketplaces, it is crucial to pay close attention to the power draw and noise levels of the devices you are considering. High power consumption can lead to increased energy costs and may require additional cooling solutions, while noisy equipment can create a disruptive environment, particularly if your home lab is located in a shared or living space. To mitigate these issues, opt for low-power, quiet devices that are designed to operate efficiently without generating excessive noise. For instance, a 24U server rack can be notoriously noisy due to the number of components it houses, but with careful selection of quieter models and proper placement, you can significantly minimize the impact on your surroundings. This approach not only ensures a more pleasant working environment but also contributes to overall energy savings and sustainability.

    2. Network Subnet

    It’s advisable to steer clear of the default subnet 192.168.1.1 for your home lab. Opting for a distinct subnet can help avert potential conflicts, particularly when connecting remotely from public networks such as those in coffee shops. For instance, if you’re using a VPN client like Wireguard to access your home lab remotely, using a common subnet like 192.168.1.1 can lead to IP conflicts. This is because many public networks and other home networks use the same default subnet, causing your VPN connection to fail or behave unpredictably. By choosing a unique subnet, you promote uninterrupted connectivity and minimize the likelihood of encountering network problems.

    3. Virtualizing Firewalls

    Never virtualize your firewall. Running a firewall on physical hardware is more reliable and prevents network outages if the host machine fails. Invest in a dedicated device for your firewall to maintain consistent internet access for your household.

    4. DNS Setup

    Setting up a DNS server can simplify network management, but ensure you have redundancy. Use at least two DNS servers to avoid losing internet access if one fails. Integrating DNS with your router can also streamline this process.

    5. Backups and Monitoring

    Implementing robust backup and monitoring solutions is essential for safeguarding critical data and services in your home lab. Tools like Zabbix can provide comprehensive monitoring of your systems, alerting you to potential issues before they become serious problems. Regular backups are crucial to ensure that you don’t lose important information. Focus on backing up essential data such as family photos, tax documents, and other irreplaceable files. Consider using both local and cloud-based backup solutions to add an extra layer of security. This way, even if one backup fails, you have another to fall back on. Additionally, schedule regular tests of your backup systems to verify that they are working correctly and that your data can be restored without issues. By taking these steps, you can maintain the integrity and availability of your critical data.

    By considering these factors, you can build a more efficient, reliable, and user-friendly home lab. Happy building!

  • How to add NFS share from Synology DSM to backup Proxmox virtual machine

    How to add NFS share from Synology DSM to backup Proxmox virtual machine

    To set up an NFS share from a Synology DSM (DiskStation Manager) and use it to back up a Proxmox virtual machine (VM), you’ll need to follow a series of steps. Here’s a detailed, step-by-step guide to help you through the process:

    1. Set Up NFS Share on Synology DSM

    1.1. Log into Synology DSM

    • Open a web browser and log into your Synology DSM interface using your administrator credentials.

    1.2. Open Control Panel

    • Go to the Control Panel from the main menu.

    1.3. Configure NFS

    • Navigate to File Services.
    • Under the File Services tab, click on NFS and enable NFS by checking the appropriate box. Click Apply if prompted.
    Enable NFS service in Synology DSM

    1.4. Create a Shared Folder

    • Go to Shared Folder under File Services.
    • Click Create to set up a new shared folder. Follow the wizard to define the folder name, location, and permissions.
    Create shared folder to use as NFS for Proxmox
    • Configure the shared folder quota if you want to limit backup capacity
    Config shared folder quota

    1.5. Configure NFS Permissions

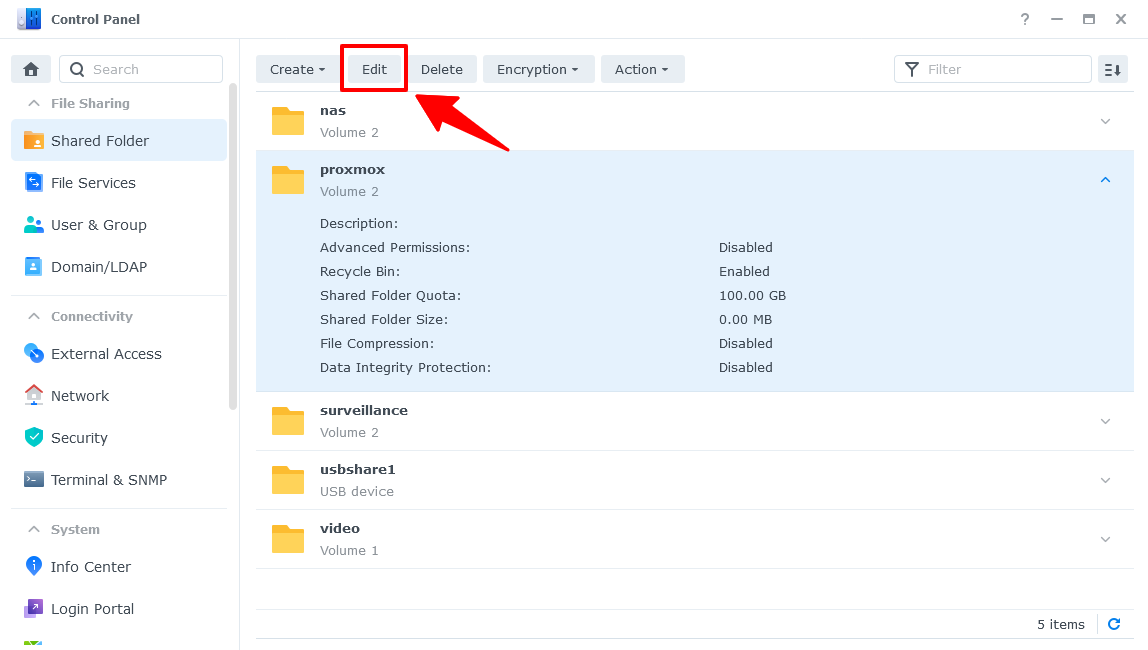
    • After creating the shared folder, select it from the list and click Edit.
    Edit Synology DSM shared folder
    • Go to the Permissions tab, and then click on NFS Permissions.
    • Click Create to add a new NFS rule.
    • In the NFS rule setup, specify the following:
      • Hostname or IP: Enter the IP address of your Proxmox server or use * for all.
      • Privilege: Set to Read/Write (or Read-only if you only need read access).
      • Squash: Select the appropriate option (usually Map all users to admin). If you do not select ‘Map all users to admin’ for the Squash option, you will encounter a ‘Permission’ error when backing up LXC containers on Proxmox.
      • Security: Configure as needed (default is often sufficient).
    • Click OK to apply the settings.
    Config NFS Permissions

    2. Mount the NFS Share on Proxmox

    2.1. Log into Proxmox Web Interface

    • Open your web browser and log into the Proxmox VE web interface.

    2.2. Access Node Configuration

    • Select the Proxmox node where you want to mount the NFS share.
    • Go to the Datacenter view and then to the Storage tab.

    2.3. Add NFS Storage

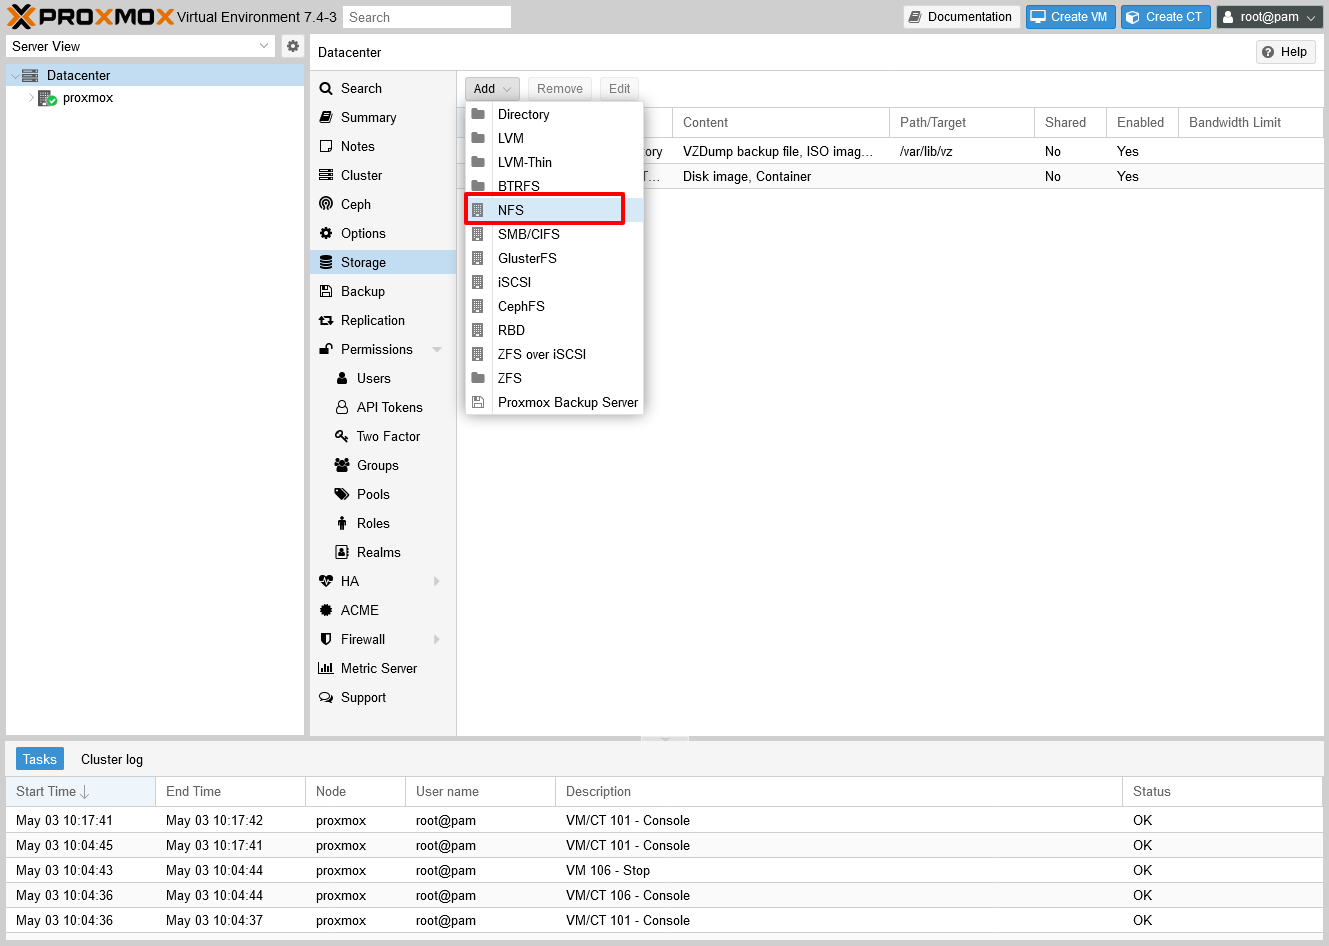
    • Click Add and select NFS.
    Add NFS to Proxmox Datacenter
    • Fill in the NFS configuration details:
      • ID: Enter a unique name for the storage.
      • Server: Enter the IP address or hostname of your Synology NAS.
      • Export: Enter the path of the shared folder created on Synology (e.g., /volume2/proxmox).
      • Content: Check the boxes for the types of content you want to store (e.g., VZDump backup file).
      • Nodes: Select the nodes that should have access to this storage.
    • Click Add to save the configuration.
    NFS configuration details

    3. Configure Backup Job

    3.1. Go to Proxmox Backup Configuration

    • In the Proxmox web interface, navigate to Datacenter and then to Backup.

    3.2. Create a Backup Job

    • Click Add to create a new backup job.
    • Configure the job settings:
      • ID: Enter a name for the backup job.
      • Storage: Select the NFS storage you configured earlier.
      • Schedule: Set the schedule for automatic backups.
      • Compression: Choose the compression method if required.
      • Retention: Configure how long backups should be retained.

    3.3. Specify VM and Backup Options

    • Choose the VMs to be backed up.
    • Configure additional options as needed, such as backup mode (snapshot, stop, or suspend).

    4. Verify and Monitor

    4.1. Run Backup Job Manually

    • To test the configuration, you can run the backup job manually from the backup configuration screen.

    4.2. Monitor Backup Jobs

    • Check the status of backup jobs and ensure that they are running successfully.
    • Monitor logs and storage space to ensure everything is working as expected.

    Troubleshooting

    • Connection Issues: Ensure that the Proxmox server can reach the Synology NAS over the network and that there are no firewall rules blocking NFS traffic.
    • Permissions Issues: Double-check NFS permissions on the Synology DSM and ensure that the Proxmox server IP has the correct access rights.

    By following these steps, you should be able to successfully set up an NFS share on Synology DSM and use it for backing up Proxmox virtual machines.

  • My Journey to Building a Homelab

    My Journey to Building a Homelab

    What is a homlab?

    A homelab, as the name suggests, is a laboratory at home. It’s a setup where individuals experiment with different types of hardware or software, often using a server or multiple servers. Homelabs are primarily used for various purposes, including learning new skills, testing out new technologies, and building prototypes.

    Why do we need a homelab?

    In this digital era, where technology is advancing at an unprecedented pace, having a homelab is becoming increasingly important. Consider it as your personal technological sandbox; a place where you can freely explore, learn, and create, away from the constraints and restrictions typically found in professional environments.

    Whether you’re honing skills for your job, pursuing a personal interest, or simply exploring the endless possibilities of technology, a homelab can be an incredibly valuable asset.

    My journey to building a homelab

    My journey to building a homelab began from a simple spark of curiosity and a burning desire to learn. It all started when I had an old laptop gathering dust and decided to breathe new life into it. I repurposed this laptop as a homeserver to self-host my blog. This blog became my digital diary, a platform where I could note, archive, and share my ideas, tips, and experiences about computers, software, blogging, technology, and much more.

    As I delved deeper into this world, I began to see the potential of my homelab. I started to expand it, gradually adding more components and capabilities. My homelab journey wasn’t always smooth and there were challenges along the way. I faced hardware failures and software issues that tested my patience and resolve. But I saw each hurdle as an opportunity to learn and grow. The first major expansion of my homelab was venturing into the realm of virtualization. I started with Proxmox as my bare-metal hypervisor, allowing me to run multiple virtual machines on the same hardware. This was complemented with Hyper-V, another virtualization technology that opened up a whole new world of possibilities for me.

    I also used my homelab to explore different Linux distributions. Through virtual machines, I learned about Ubuntu and Debian Linux distributions, getting hands-on experience with their unique features and capabilities. This also led me to experiment with LXC containers and Docker, further expanding my knowledge and skills.

    Ad-blocking was another area I decided to delve into. With AdGuard Home and PiHole, I was able to block ads network-wide, improving my browsing experience and protecting my devices from malicious ads.

    My homelab journey also saw me building a Network Attached Storage (NAS) using OpenMediaVault and Xpenology. This provided a centralized storage solution for my home network, giving me easy access to my files and data from any device.

    Furthermore, I set up a media server with Emby, Jellyfin, and a host of “*arr” suites. This allowed me to have my own personal Netflix, storing and streaming my favorite movies and series.

    Conclusion

    Today, my homelab is more than just a hobby. It’s a robust setup that allows me to experiment with a wide range of technologies and projects. It’s a playground for my curiosity, a lab for my experiments, and a classroom for my learning. It has become an essential part of my life, helping me grow professionally and personally. My homelab journey has been a testament to the power of learning by doing, and I can’t wait to see where it takes me next.