Setting Up WireGuard Easy with Portainer: A Step-by-Step Guide
This guide will walk you through the process of setting up a WireGuard VPN using Portainer

WireGuard Easy is a popular, user-friendly solution for setting up a WireGuard VPN. Combined with the power of Portainer, a container management platform, you can effortlessly deploy and manage your VPN. This guide will walk you through the process.
Prerequisites
- A server running Docker and Portainer.
- Basic understanding of Docker and Portainer.
- A domain name (optional, but recommended for easy access).
Step-by-Step Guide to install Wireguard VPN using Portainer
Step 1: Log in to your Portainer instance.
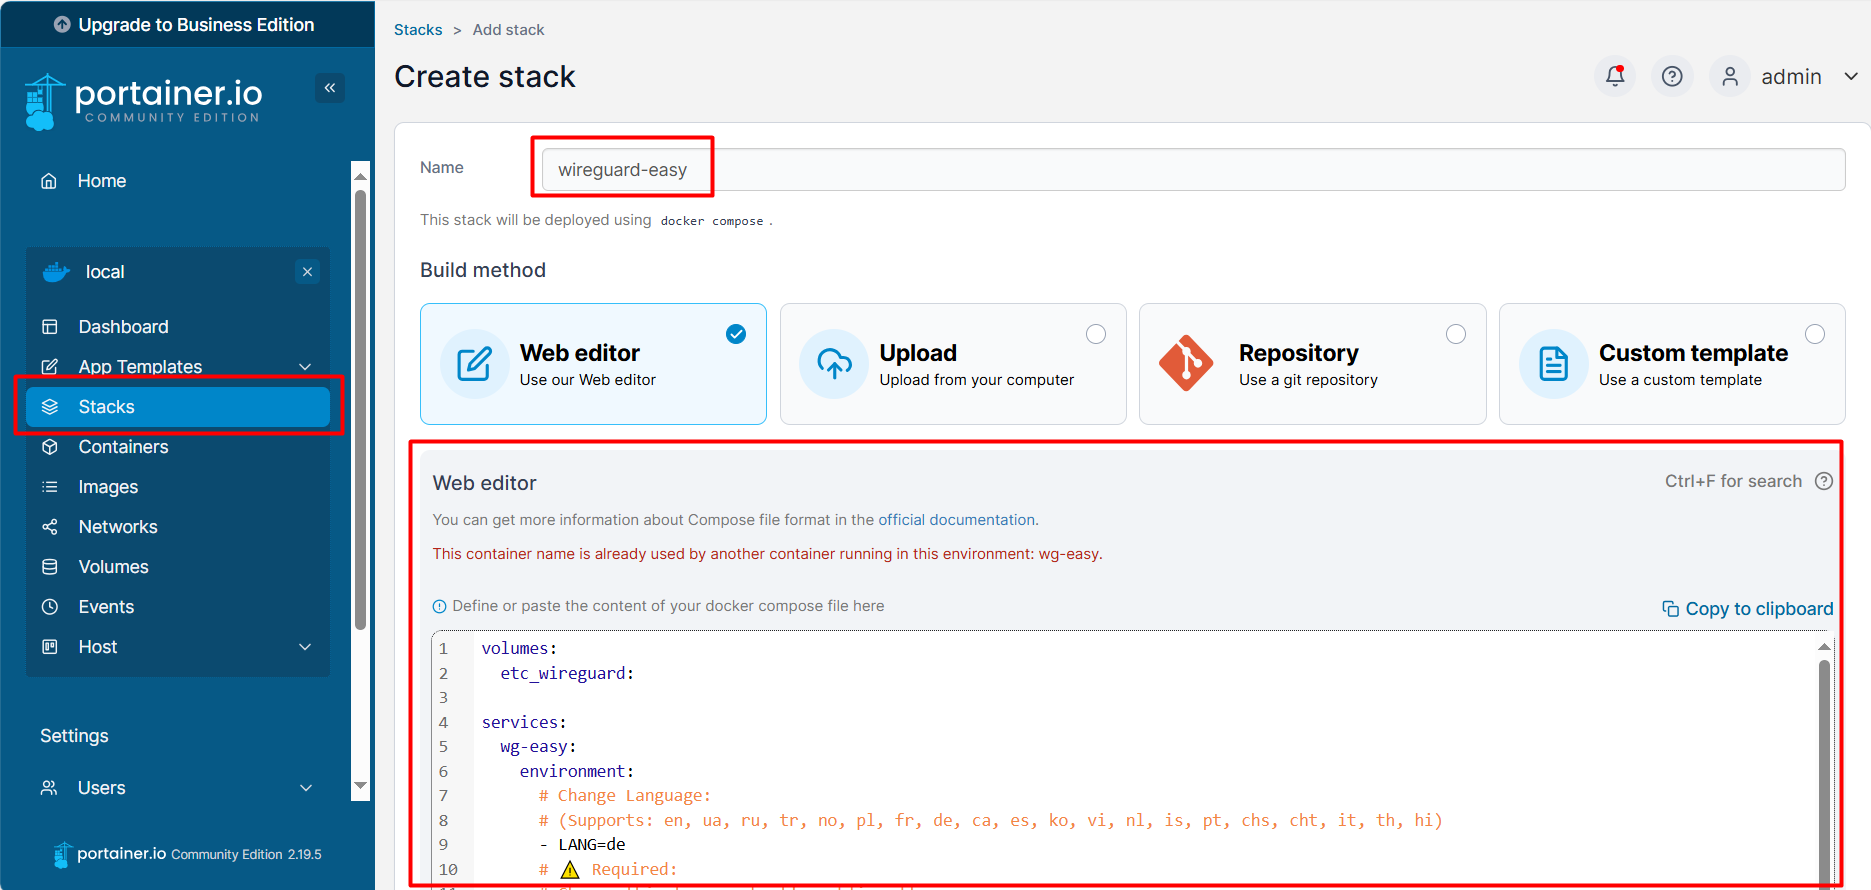
Step 2: Create a New Stack:
- Navigate to the "Stacks" section.
- Click "Add stack".
- Give your stack a name (e.g., "wireguard-easy").
- Paste the Docker Compose file content to the Web editor form, using the content as below:
volumes:
  etc_wireguard:

services:
  wg-easy:
    environment:
      # Change Language:
      # (Supports: en, ua, ru, tr, no, pl, fr, de, ca, es, ko, vi, nl, is, pt, chs, cht, it, th, hi)
      - LANG=de
      # ⚠️ Required:
      # Change this to your host's public address
      - WG_HOST=raspberrypi.local

      # Optional:
      # - PASSWORD_HASH=$$2y$$10$$hBCoykrB95WSzuV4fafBzOHWKu9sbyVa34GJr8VV5R/pIelfEMYyG (needs double $$, hash of 'foobar123'; see "How_to_generate_an_bcrypt_hash.md" for generate the hash)
      # - PORT=51821
      # - WG_PORT=51820
      # - WG_CONFIG_PORT=92820
      # - WG_DEFAULT_ADDRESS=10.8.0.x
      # - WG_DEFAULT_DNS=1.1.1.1
      # - WG_MTU=1420
      # - WG_ALLOWED_IPS=192.168.15.0/24, 10.0.1.0/24
      # - WG_PERSISTENT_KEEPALIVE=25
      # - WG_PRE_UP=echo "Pre Up" > /etc/wireguard/pre-up.txt
      # - WG_POST_UP=echo "Post Up" > /etc/wireguard/post-up.txt
      # - WG_PRE_DOWN=echo "Pre Down" > /etc/wireguard/pre-down.txt
      # - WG_POST_DOWN=echo "Post Down" > /etc/wireguard/post-down.txt
      # - UI_TRAFFIC_STATS=true
      # - UI_CHART_TYPE=0 # (0 Charts disabled, 1 # Line chart, 2 # Area chart, 3 # Bar chart)
      # - UI_SHOW_LINKS=true
      # - UI_ENABLE_SORT_CLIENTS=true

    image: ghcr.io/wg-easy/wg-easy
    container_name: wg-easy
    volumes:
      - etc_wireguard:/etc/wireguard
    ports:
      - "51820:51820/udp"
      - "51821:51821/tcp"
    restart: unless-stopped
    cap_add:
      - NET_ADMIN
      - SYS_MODULE
      # - NET_RAW # ⚠️ Uncomment if using Podman
    sysctls:
      - net.ipv4.ip_forward=1
- net.ipv4.conf.all.src_valid_mark=1- Change
WG_HOSTto your server's public IP address or domain name. - For the
PASSWORD_HASH, run this command in terminal to get yours. Remember to replacefoobar123with your own password
sudo docker run ghcr.io/wg-easy/wg-easy wgpw foobar123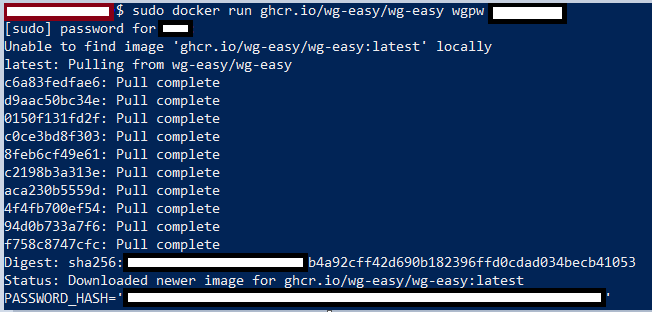
After this command, your will receive password hash.
Important : Please don't wrap the generated hash password in single quotes when you use docker-compose.yml. Instead, replace each $ symbol with two $$ symbols. For example:
- PASSWORD_HASH=$$2y$$10$$hBCoykrB95WSzuV4fafBzOHWKu9sbyVa34GJr8VV5R/pIelfEMYyGStep 3: Click Deploy the Stack and wait for the deployment complete.
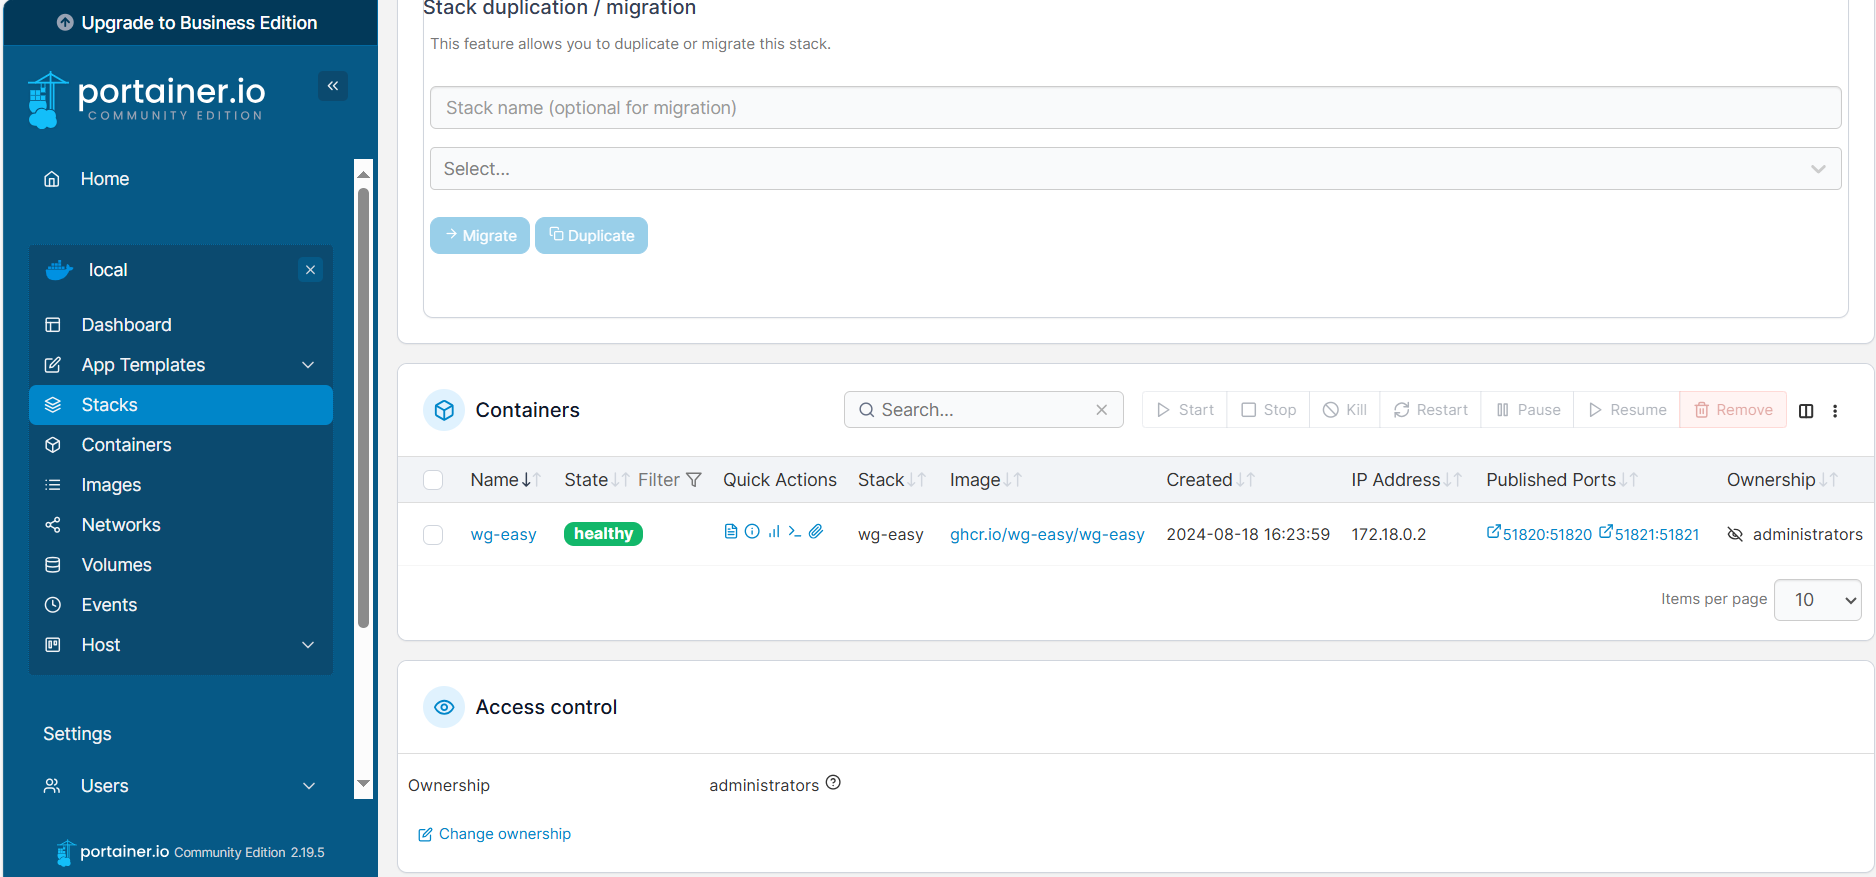
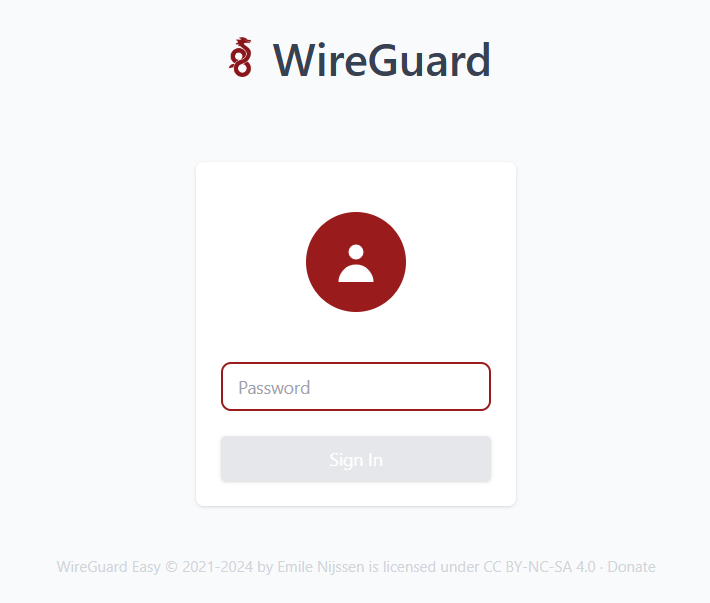
Access WireGuard Easy:
Once the deployment is complete and the container's State change to healthy, you can access the WireGuard Easy web interface at http://your_server_ip:51821. Use the password you have set before to login.
Add new Wireguard Client

The Web UI for managing WireGuard is extremely user-friendly and easy to use.
- Click 'New' to create a client.
- Click the QR code icon to view the QR code used for setting up the WireGuard client on a phone.
- Click the 'Download' icon to download the configuration file, which is used to set up the WireGuard client on a computer.
- Click the 'Trash' icon to delete a client.
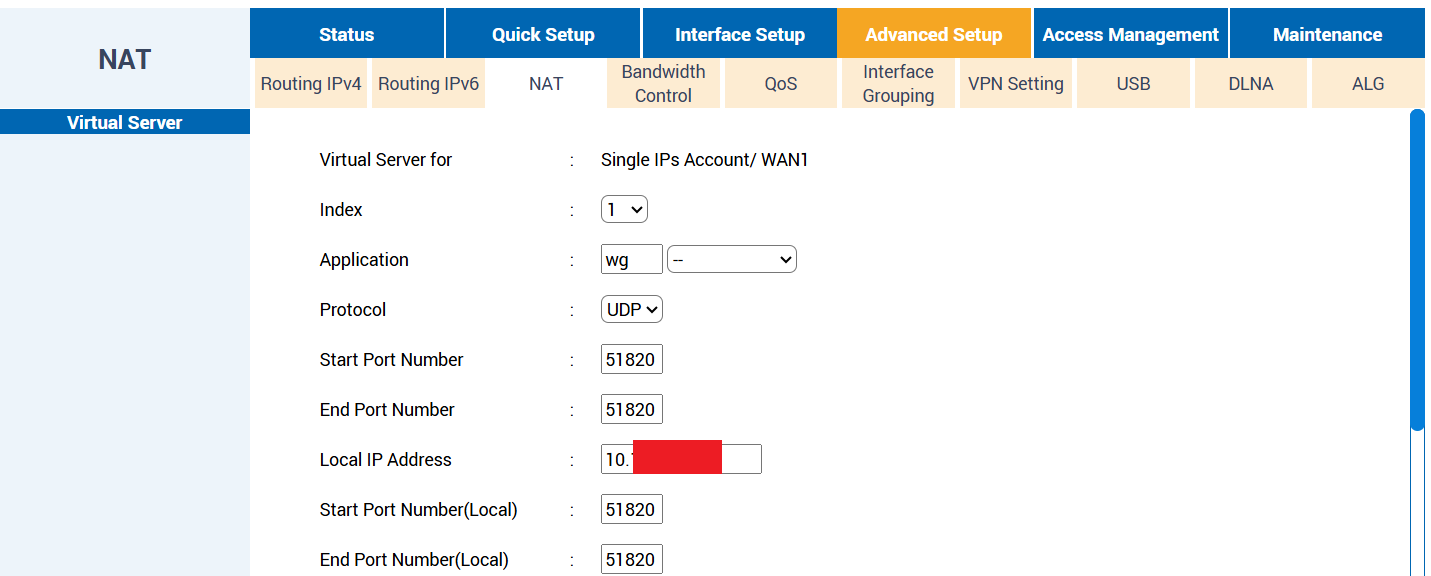
Configuring NAT Port for WireGuard
To connect to the WireGuard VPN Server from outside, you need to configure port forwarding on your network router (if WireGuard is installed on a server at home) or configure the firewall if it's installed on a Cloud virtual machine. Configure port forwarding on the router with the following details:
- Protocol: UDP
- Port: 51820
- Address: IP of the machine running wg-easy
Additional Tips
- For enhanced security, consider using a strong password for the web UI.
- Adjust
WG_ALLOWED_IPSto control which traffic is allowed through the VPN. - Use a dynamic DNS service if your IP address changes frequently.
- Refer to the WireGuard Easy documentation for more advanced configuration options.
Conclusion
By following these steps, you've successfully set up WireGuard Easy using Portainer. You can now manage your VPN and create client configurations with ease. Enjoy the benefits of secure and private internet access!
Would you like to add more details to this blog post, such as configuring WireGuard clients or troubleshooting common issues?


