Tag: NAS

  • Using a USB Flash Drive as an OS Drive for OpenMediaVault: Considerations and Recommendations

    Using a USB Flash Drive as an OS Drive for OpenMediaVault: Considerations and Recommendations

    Installing OpenMediaVault (OMV) on a USB flash drive might seem unconventional at first, but it’s a practice that’s not only possible but also offers several advantages, especially for home server setups. Many professional-level servers boot from USB drives, and OMV is no exception. This article explores the key considerations, recommendations, and practical tips for setting up and maintaining a USB flash drive as an operating system (OS) drive for OpenMediaVault, covering important aspects like plugins, storage size, performance, and backup strategies.

    1. Choosing the Right USB Drive

    When using a USB flash drive for OMV, selecting the right drive is crucial for long-term stability and performance. Here are the main factors to consider:

    Storage Size

    While it’s technically possible to install OMV on an 8GB flash drive, this is not recommended. Although some users might try it, the limited space can quickly lead to problems, such as running out of storage for system updates or configurations. Users in forums often report issues when using 8GB flash drives for OMV installations, with many recommending a minimum of 16GB to avoid these problems. Ideally, a 32GB flash drive is a safe bet, providing ample room for the system and future updates without causing space constraints. Some experienced users even suggest going as large as 64GB, though this might be overkill unless you plan to run a large number of services directly from the USB drive.

    USB Version

    The speed of your USB drive has a direct impact on the performance of OMV. Using USB 2.0 can result in sluggish performance, particularly when it comes to system responsiveness and boot times. For optimal performance, you should use at least USB 3.0 or higher. USB 3.0 offers significantly faster read and write speeds compared to USB 2.0, which is critical when the operating system is being loaded and run directly from the drive. If you have access to USB 3.2, even better—though in most setups, USB 3.0 is more than sufficient.

    2. Essential Plugins: Flash Memory Plugin

    One of the key concerns when using a USB flash drive as the OS drive is the potential for excessive wear due to constant read/write operations. Flash drives have a limited number of write cycles, and frequent writes can degrade the drive over time, shortening its lifespan. To mitigate this risk, it is highly recommended to install the openmediavault-flashmemory plugin.

    This plugin optimizes how data is written to the flash drive, minimizing wear by shifting frequently written data to RAM, thereby reducing the number of writes to the USB drive. This can significantly extend the lifespan of the flash drive while maintaining system performance. Without this plugin, you run the risk of prematurely wearing out the USB drive, which could lead to data loss or the need for a costly replacement.

    3. Performance Considerations

    Running OpenMediaVault from a USB drive, particularly with the right hardware, does not significantly impact system speed, as much of the data is handled in RAM. However, the performance of USB storage drives—especially older models—can vary widely. USB 3.0 or higher versions, as mentioned earlier, are essential for smooth operation. Many users report that their OMV setups, even when running from a USB flash drive, perform comparably to setups running on SSDs.

    Moreover, if you plan to run Docker containers on OMV, it’s wise to use the USB flash drive for the OS while storing Docker data on a faster SSD or NVMe drive. This setup helps separate system operations from resource-intensive storage tasks, ensuring better overall performance.

    4. Setting Up OMV on a USB Drive

    Setting up OMV on a USB flash drive is relatively straightforward. Once you have your USB drive (preferably 16GB or larger) and the necessary plugins installed, you can proceed with the installation. Here’s a general outline of the process:

    • Install OMV on the USB drive: You can use tools like Raspberry Pi Imager or Etcher to create a bootable OMV image on your USB drive.
    • Configure the system: Once OMV is installed, boot from the USB and begin configuring your system.
    • Install the flashmemory plugin: After setting up OMV, make sure to install the flashmemory plugin immediately to prevent unnecessary writes to the USB drive. This will optimize performance and prolong the life of your drive.
    • Transfer OMV Configuration: If you have an existing OMV installation, you can use the omv-regen tool to move your configuration to the new USB setup, making migration simple and hassle-free.

    5. Backup and Maintenance

    One of the biggest advantages of using a USB flash drive for OMV is ease of backup and restoration. Since the entire OS is contained on a single USB drive, it’s incredibly easy to back up or clone. A tool like usbimager can be used to create an exact image of the drive, allowing for quick restoration in the event of a failure.

    Backup Tips:

    • Regular Backups: Periodically create an image of your USB drive to ensure you can quickly restore OMV to its previous state if necessary. It’s also a good idea to store backups in multiple locations (e.g., an external hard drive or cloud storage) for added security.
    • Monitoring Drive Health: Keep an eye on the health of your USB flash drive. Some utilities can monitor the wear level of flash storage and alert you when the drive is nearing its limits.

    6. Practical Considerations for Long-Term Use

    Using a USB drive for OMV is a practical solution for home servers or small-scale deployments, but it’s important to keep in mind a few long-term considerations:

    • Physical Placement: If your server case has limited USB ports, ensure the flash drive is securely fastened to avoid accidental disconnection. Some users recommend using adapters or zip ties to ensure the drive stays in place.
    • Keep It Cool: USB drives can heat up, especially when under load. Ensure your case has adequate ventilation, or consider using a USB extension cable to place the drive in a cooler spot.

    Conclusion

    Using a USB flash drive as an OS drive for OpenMediaVault can offer excellent performance and convenience when set up properly. By choosing the right drive size, ensuring you’re using a USB 3.0 or higher, installing the flashmemory plugin, and maintaining regular backups, you can enjoy a stable and efficient system without the need for expensive SSDs or NVMe drives. This setup is ideal for users seeking an affordable, easily maintained, and flexible storage solution for their OMV-based home server.

  • How to install Komga in OpenMediaVault Using Docker Compose

    How to install Komga in OpenMediaVault Using Docker Compose

    Komga is a free and open-source media server for your comics, manga, magazines, and books. It supports comic book archives such as CBZ and CBR (except solid archives, for RAR5 see below); eBooks in EPUB format; and PDF files.

    This article provides a concise guide on how to install Komga in OpenMediaVault (OMV) using Docker Compose.

    Prerequisites

    • OpenMediaVault installed and running
    • Docker and Docker Compose installed on OMV
    • Basic knowledge of using the OMV web interface

    Step-by-Step Guide

    1. Create Necessary Folders

    1. Go to Storage > Shared Folders.
    2. Create another folder named komga for Komga’s configuration and data.

    2. Create Docker Compose File

    Navigate to Services > Compose > Files and add the following content to the file:

    version: '3.3'services:  komga:    image: gotson/komga    container_name: komga    volumes:      - /path/to/komga/config:/config      - /path/to/komga/data:/data    ports:      - 25600:25600    restart: unless-stopped

    Remeber to replace /path/to/komga/config and /path/to/komga/data with the actual paths to your komga folder.

    In my case, because I have already add global environment file for OpenMediaVault docker, so my compose file is simple as the picture below:

    My compose file for Komga in OpenMediaVault

    After carefully finish editing all the parameters, Save the compose file and click Up button to deploy Komga container.

    Deloy the Komga container in OpenMediaVault

    3. Initial login and setup

    Open your web browser and starting to use Komga. At this time, Komga should now be running and accessible at http://<your-OMV-IP>:25600.

    At the first step, Komga will ask you to create a user account. Choose an email and password, then click on Create User Account and start using Komga.

    Komga overview

    Conclusion

    You have successfully installed Komga on OpenMediaVault using Docker Compose. You can now start adding your comics, manga, and books to Komga and enjoy your media library.

  • Installing qBittorrent on openmediavault Using Docker Compose

    qBittorrent is a popular, open-source BitTorrent client that offers a clean interface and a wide range of features. It is designed to be a lightweight alternative to other BitTorrent clients while providing the same level of functionality. With qBittorrent, users can manage their torrent downloads efficiently, thanks to features like an integrated search engine, RSS feed support, and remote control via a web user interface. In this blog post, we will go through step-by-step to install qBittorrent on OpenMediaVault using Docker Compose, as well as some initial setting for it.

    Step-by-Step Guide to Install qBittorrent on openmediavault Using Docker Compose

    Prerequisites:

    Step 1: Prepare Your Environment

    1. Log in to openmediavault: Access your openmediavault web interface.
    2. Enable Docker Repo: Navigate to System > omv-extras and enable the Docker repository. Click Save and then Apply.
    3. Install Docker and Docker Compose: Go to System > Plugins, search for docker and openmediavault-compose, and install both plugins.

    Step 2: Create a Docker Compose File

    Go to Services -> Compose -> Files, then click New to create new docker-compose.yaml file for qBittorrent.

    For me, I use the docker-compose content from linuxserver: https://hub.docker.com/r/linuxserver/qbittorrent

    ---services:  qbittorrent:    image: lscr.io/linuxserver/qbittorrent:latest    container_name: qbittorrent    environment:      - PUID=1000      - PGID=1000      - TZ=Etc/UTC      - WEBUI_PORT=8080      - TORRENTING_PORT=6881    volumes:      - /path/to/qbittorrent/appdata:/config      - /path/to/downloads:/downloads #optional    ports:      - 8080:8080      - 6881:6881      - 6881:6881/udp    restart: unless-stopped

    Paste the above content to Remember to change the parameters according to your system. Then click Save.

    Step 3: Deploy the qBittorrent Container

    Click “Up” button to pull the docker image and deploy the container. Wait for it’s status change to “Up”.

    Step 4: Access the qBittorrent Web Interface

    1. Open Your Browser: Navigate to http://<your-server-ip>:8080 to access the qBittorrent web interface.
    2. Login: The default username is admin and the default password is automatically generated. You can get the password by SSH into OpenMediaVault and run the following command to read to qBittorrent container log and get the password there.
    docker logs qbittorrent

    Make sure to change these credentials after your first login for security reasons.

    Change Default Credentials: Go to Options > Web UI and change the default username and password.

    Set Download Locations: Configure your download locations under Downloads to ensure your files are saved in the correct directories. For me I also config other settings as below:

    Config OpenTracker: udp://tracker.opentrackr.org:1337/announce

    Configure Bandwidth Limits: Set appropriate upload and download speed limits under Speed to manage your network usage.

    Enable IP Filtering: For added security, enable IP filtering under Connection.

    By following these steps, you should have a fully functional qBittorrent setup on your openmediavault server using Docker Compose. Enjoy your efficient and powerful torrent management system!

  • How to Install Docker, Docker Compose, and Portainer on OpenMediaVault Using OMV-Extras

    How to Install Docker, Docker Compose, and Portainer on OpenMediaVault Using OMV-Extras

    OpenMediaVault (OMV) is a powerful and flexible NAS (Network Attached Storage) solution based on Debian Linux. By leveraging OMV-Extras, you can easily install Docker, Docker Compose, and Portainer to manage your containers efficiently. This guide will walk you through the steps to get everything set up.

    Prerequisites

    • A running instance of OpenMediaVault (preferably version 6 or later).
    • Basic knowledge of SSH and command-line operations.
    • Internet access to download necessary packages.

    Step 1: Install OMV-Extras

    OMV-Extras is a plugin that extends the functionality of OpenMediaVault by adding additional repositories and plugins.

    SSH into your OMV server: Open a terminal and connect to your OMV server using SSH.

    ssh your-username@your-omv-ip

    Install OMV-Extras: Run the following commands to download and install OMV-Extras.

    wget -O - https://github.com/OpenMediaVault-Plugin-Developers/packages/raw/master/install | bash

    Step 3: Enable Docker Repository

    1. Access OMV Web Interface: Open your web browser and navigate to the OMV web interface (usually http://your-omv-ip).
    2. Enable Docker Repo: Go to System > OMV-Extras and enable the Docker repository. Click Save and then Apply.

    Step 3: Install Docker Compose

    Docker Compose is now part of the openmediavault-compose plugin. Search for openmediavault-compose in the plugins section, select it and click on Install button, check the Confirm box and click Yes to install it.

    Wait for the OpenMediaVault Compose plugin installation complete, then press Close.

    Now the Compose section should appear under Plugin menu:

    Step 4: Create user for docker

    Go to Users -> Users > Create User to create a new user call appuser. For the Shell scetion, we don’t need this account using terminal so choose usr/sbin/nologin. For Groups, choose users. Then click Save, and Apply.

    Step 5: Configure Docker

    1. Create a Shared Folder for Docker: Go to Storage > Shared Folders and create a new shared folder named dockerdata on your desired volume.
    2. Create a shared folder for compose file: dockerdata/appdata as shown in the pictures above.
    3. Similarly, create a shared folder for compose file: dockerdata/backup_compose.
    4. Create a shared folder for docker file: dockerdata/docker
    5. Create a shared folder for data file in the main HDD (to define a path to a shared folder using the CHANGE_TO_COMPOSE_DATA_PATH variable): data
    6. Set Docker Storage Path: Go to Services > Docker > Settings. Set the Docker storage path to the shared folders you have created. Click Save and then Apply.

    Step 5: Install Portainer

    Portainer is a lightweight management UI that allows you to easily manage your Docker environments.

    1. Install Portainer: Go to Services > Compose > Files. Click on Add from example and select portainer. Name it portainer and click Save.
    2. Deploy Portainer: In the same Compose section, click on the Up arrow to deploy Portainer. This will download and start the Portainer container.
    3. Access Portainer: Open your web browser and navigate to http://your-omv-ip:9000. Follow the setup instructions to configure Portainer.

    Conclusion

    By following these steps, you should have Docker, Docker Compose, and Portainer up and running on your OpenMediaVault server. This setup allows you to manage your containers efficiently and take full advantage of the powerful features OMV offers.

  • How to Install AdGuard Home on OpenMediaVault Using openmediavault-compose

    How to Install AdGuard Home on OpenMediaVault Using openmediavault-compose

    AdGuard Home is a comprehensive network-wide software that blocks ads and tracking services, enhancing privacy and security for all devices connected to a network. It operates as a DNS server, filtering out unwanted content before it reaches your devices, similar to a local version of a public DNS service like AdGuard DNS.

    Here’s a brief overview:

    1. Ad-Blocking: AdGuard Home blocks ads across all devices on your network, including smartphones, tablets, and smart TVs. This is especially useful for devices where traditional ad blockers may not work as effectively.
    2. Privacy Protection: By blocking tracking scripts and analytics systems, AdGuard Home prevents third parties from collecting your data, offering a higher level of privacy.
    3. DNS-Based Filtering: As a DNS server, AdGuard Home filters requests at the network level. This means that ads and trackers are blocked before they even reach your devices, reducing the amount of data downloaded and speeding up your internet connection.
    4. Customizability: Users can create custom filters, blocklists, and allowlists to tailor the blocking to their needs. It also supports parental control features, allowing users to block access to adult content.
    5. Open Source: AdGuard Home is open-source, allowing users to inspect the code, contribute to its development, and ensure that it operates transparently.
    6. Cross-Platform: It can be installed on various devices, including Raspberry Pi, Linux, Windows, macOS, and even in Docker containers, making it highly versatile.

    In summary, AdGuard Home provides a robust, customizable, and privacy-focused solution for blocking ads and tracking across your entire home network.

    In this guide, we’ll walk you through the steps to install AdGuard Home on OpenMediaVault (OMV) using openmediavault-compose. This setup will help you manage your network’s DNS and block ads efficiently.

    Prerequisites

    • OpenMediaVault installed and running
    • openmediavault-compose plugin installed
    • Basic understanding of Docker and networking

    Step 1: Create a MacVLAN Network

    First, we need to create a MacVLAN network for the AdGuard container. This allows the container to have its own IP address, making it easier to manage ports.

    1. Access OMV Compose Plugin: Go to the OMV web interface and navigate to the openmediavault-compose plugin.
    2. Create Network: Under the “Services -> Compose -> Networks” tab, create a new network. Name it local-network.
    3. Configure Network:
      • Driver: select macvlan.
      • Parent Network: Select your main network interface, in my case it is enp2s0.
      • Subnet: Enter your subnet (e.g., 192.168.1.0/24).
      • Gateway: Enter your gateway (e.g., 192.168.1.1).
      • IP range: Enter your expected IP for Adguard Home (e.g., 192.168.1.200/32).
      • Click Save.

    Step 2: Create Docker Compose File

    Now, we’ll create a Docker Compose file to configure and run the AdGuard Home container.

    1. Create Compose File: Go to Services -> Compose -> Files, create a new compose file and name it adguard.
    2. Add Configuration: Paste the following configuration into the compose file. Remember to change the ipv4_address to match your network configuration. Then click Save.
    ---services:    adguardhome:        container_name: adguardhome        image: adguard/adguardhome        networks:          adguardhome:            ipv4_address: 192.168.1.200  #Change this to your ip address        volumes:            - CHANGE_TO_COMPOSE_DATA_PATH/adguardhome/workdir:/opt/adguardhome/work            - CHANGE_TO_COMPOSE_DATA_PATH/adguardhome/confdir:/opt/adguardhome/conf        restart: unless-stopped        ports:            - 53:53/tcp            - 53:53/udp            - 67:67/udp            - 68:68/udp            - 80:80/tcp            - 443:443/tcp            - 443:443/udp            - 3000:3000/tcp            - 853:853/tcp            - 784:784/udp            - 853:853/udp            - 8853:8853/udp            - 5443:5443/tcp            - 5443:5443/udpnetworks:   adguardhome:      name: local-network  #This is the name of our macvlan      external: true

    Step 3: Deploy AdGuard Home

    Deploy the AdGuard Home container using the compose file.

    1. Deploy Container: In the openmediavault-compose plugin, select the adguard compose file and click “Up”.
    2. Verify Deployment: Ensure the container is running and accessible.

    Step 4: Configure AdGuard Home

    Finally, configure AdGuard Home through its web interface.

    1. Access Web Interface: Open a web browser and go to http://192.168.1.200:3000.
    2. Initial Setup: Follow the on-screen instructions to complete the initial setup.
    3. Set DNS Server: Point your router’s DNS settings to the AdGuard Home IP address (e.g., 192.168.1.200).

    Conclusion

    Congratulations! You’ve successfully installed and configured AdGuard Home on OpenMediaVault using openmediavault-compose. This setup will help you manage your network’s DNS and block ads effectively.

    Feel free to customize this blog post to better fit your style and audience! If you have any questions or need further assistance, let me know.

  • Installing OMV-Extras on OpenMediaVault: A Comprehensive Guide

    Installing OMV-Extras on OpenMediaVault: A Comprehensive Guide

    1. What is OMV-Extras?

    OMV-Extras is a powerful plugin for OpenMediaVault (OMV) that significantly expands its capabilities. It offers a range of additional features and tools, making your NAS more versatile and efficient.

    1. Why Install OMV-Extras?
    • Expand OMV functionality: Access a wider range of plugins and applications.
    • Simplify installation: Streamline the process of installing various software packages.
    • Enhance performance: Optimize your NAS for specific tasks.
    1. Prerequisites:
    • An OpenMediaVault server up and running. If you don’t have one, you can find out how to install OpenMediaVault in the box below.
    • Basic understanding of Linux command line (for command-line method).
    • SSH access to your OMV server (for command-line method).
    Step-by-Step Guide to Install OpenMediaVault on Proxmox and Enabling SMB Share
    A comprehensive guide for installing OpenMediaVault on Proxmox and setting up an SMB share for easy file sharing across your network


    1. Installation of OMV-Extras using command-line:

    Step1: Open a terminal window and SSH into your OMV server.

    Step2: Execute the following command:

    wget -O - https://github.com/OpenMediaVault-Plugin-Developers/packages/raw/master/install | bash
    Install OMV-Extras in Openmediavault

    Wait for the installation process to complete.

    1. Verifying Installation:

    Check if the omv-extras plugin is listed in the “System -> Plugins” section of the OMV web interface to ensure OMV-Extras is installed correctly.

    1. Additional Tips:
    • Always back up your system before making significant changes.
    • Refer to the official OMV-Extras documentation for detailed instructions and troubleshooting.
    • Explore the available plugins and tools to maximize the benefits of OMV-Extras.

    By following these steps, you should have successfully installed OMV-Extras on your OpenMediaVault server. Enjoy the expanded capabilities and features it brings!

  • OpenMediaVault installed on laptop – how to turn screen off automatically

    OpenMediaVault installed on laptop – how to turn screen off automatically

    I’ve just set up OMV on an old laptop, but even if I close the lid the screen stays on. I’m wanting to have it turned off as fully as possible – not just to save the screen but to save whatever processing power it takes if that makes sense.

    1. Introduction

    In order to save energy and protect the laptop screen, I need to set the screen to the Blank state after 1 min and turn it off after 2 min. Any keypress will turn it back on. Make it auto-start after reboot. The magic command what will do all the work:

    setterm --blank 1 --powerdown 2

    If you get error:

    setterm: terminal xterm-256color does not support --blank

    You are probably trying this command by SSH. You must run it from local of your machine, or do next stage of this guide.

    2. Make it auto-start

    Insert command in executable file

    Insert command in executable file. Store it for example in hidden folder of your home directory /home/USER/.boot-scripts/screen-off.sh (Create the folder using mkdir command first):

    sudo mkdir /home/USER/.boot-scripts/sudo nano /home/USER/.boot-scripts/screen-off.sh

    Paste this to screen-off.sh file:

    #!/bin/bashsetterm --blank 1 --powerdown 2

    Save the file by Ctrl+O, Enter, then Ctrl+X

    And make script file executable by systemctl

    Create file /etc/systemd/system/screen-off.service

    sudo nano /etc/systemd/system/screen-off.service

    Paste this to screen-off.service file:

    [Unit]Description=Blank screen after 1 min and turn it off after 2 min. Any keypress will turn it back on.After=ssh.service[Service]Type=oneshotEnvironment=TERM=linuxStandardOutput=ttyTTYPath=/dev/consoleExecStart=/home/USER/.boot-scripts/screen-off.sh[Install]WantedBy=local.target

    Save the file by Ctrl+O, Enter, then Ctrl+X

    Make it executable:

    sudo chmod +x /home/USER/.boot-scripts/screen-off.shsudo chmod +x /etc/systemd/system/screen-off.service

    And finally get it working and enabled on boot:

    sudo systemctl start screen-off.servicesudo systemctl enable screen-off.service

    To disable it:

    sudo systemctl disable screen-off.service

    3. Other way to automatically turn screen off on boot

    Linux has a boot parameter consoleblank=XX which powers off the tty after XX seconds.
    To use this parameter: Edit /etc/default/grub

    sudo nano /etc/default/grub

    Then add consoleblank=60 to the GRUB_CMDLINE_LINUX_DEFAULT= parameter. For example

    GRUB_CMDLINE_LINUX_DEFAULT="quiet splash consoleblank=60"

    Then update GRUB and reboot by run:

    sudo update-grubsudo reboot

    With this, the display should turn off after one minute (adjust the number if this is too short for you). This will work both on the login prompt, and when someone is logged in.

  • How to Install Proxmox Backup Server as a VM and backup to NAS
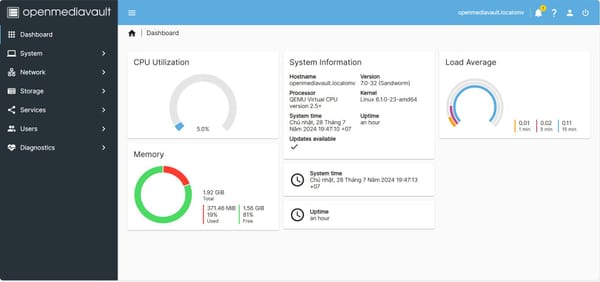
    Setting up a Proxmox Backup Server (PBS) as a virtual machine (VM) within Proxmox Virtual Environment (PVE) is a great way to manage your backups efficiently. This guide will walk you through the process of installing PBS as a VM and configuring it to back up your Proxmox VMs and LXC containers to a Network Attached Storage (NAS).

    Step 1: Prepare the Proxmox Backup Server ISO

    1. Download the ISO: First, download the Proxmox Backup Server ISO from the official Proxmox website.
    2. Upload the ISO to Proxmox: Navigate to your Proxmox web interface, go to the storage section, and upload the ISO file.
    Upload the Proxmox Backup Server ISO image to the Proxmox host

    Step 2: Create a Virtual Machine for Proxmox Backup Server

    1. Create a New VM: In the Proxmox web interface, click on “Create VM”.
    2. Configure VM Settings:
      • Node: Select the node where you want to create the VM.
      • VM ID: Assign a unique ID for the VM.
      • Name: Give your VM a name, e.g., ProxmoxBackupServer.
      • Check Start At Boot box to make sure the PBS automatically start when the system boot.
    3. OS Configuration:
      • ISO Image: Select the Proxmox Backup Server ISO you uploaded.
      • Guest OS Type: Choose Linux and Other Linux 6.x or higher kernel.
    4. System Configuration: leave it as default
    5. Hard Disk:
      • Bus/Device: Choose VirtIO Block.
      • Storage: Select your storage location.
      • Disk Size: Allocate sufficient disk space (e.g., 32GB or more).
      • SSD Emulation: checked.
    6. CPU:
      • Cores: Assign at least 2 cores.
      • Type: Set to host for better performance.
    7. Memory:
      • RAM: Allocate at least 4GB.
      • Ballooning Device: unchecked.
    8. Network:
      • Model: Choose VirtIO (paravirtualized).

    Step 3: Install Proxmox Backup Server

    1. Start the VM: Boot the VM from the ISO.
    2. Follow the Installation Wizard: Complete the installation by setting the root password, email, time zone, and network settings.
    3. Access the Web Interface: Once installed, access the PBS web interface via https://<PBS_IP>:8007.

    Step 4: Add a CIFS for SMB mount and Configure NAS for Backup Storage in Proxmox Backup Server

    Install CIFS Utils:

    After PBS installation finished, login (or SSH) as root and install CIFS Utils:

    apt install cifs-utils

    Create a Mount Directory:

    mkdir /mnt/omvnas

    Add SMB credentials to mount NAS:

    Create .smbcreds to store NAS login data:

    nano /etc/samba/.smbcreds

    Put the username and password to the file and Save (Ctrl+O, Enter, Ctrl+X):

    username=smb_usernamepassword=smb_password

    Change file permission to be read-only by root:

    chmod 400 /etc/samba/.smbcreds

    Mount the SMB Share:

    Create shared folder on OMVNAS, then mount it to the /mnt/omvnas folder. Remember to replace //IP-OF-NAS/SHARE-NAME to your actual NAS shared folder:

    mount -t cifs -o rw,vers=3.0,credentials=/etc/samba/.smbcreds,uid=34,gid=34 //IP-OF-NAS/SHARE-NAME /mnt/omvnas
    Step-by-Step Guide to Install OpenMediaVault on Proxmox and Enabling SMB Share
    A comprehensive guide for installing OpenMediaVault on Proxmox and setting up an SMB share for easy file sharing across your network


    Check if the shared folder is mounted successfully by make a new directory name “test” using the command in terminal, and check it appear in your NAS:

    mkdir /mnt/omvnas/test

    Make the Mount Persistent:

    Edit the fstab file to automatically mount the folder when the PBS server boot:

    nano /etc/fstab

    Add this line to the fstab file and Save. Remember to replace //IP-OF-NAS/SHARE-NAME to your actual NAS shared folder:

    //IP-OF-NAS/SHARE-NAME /mnt/omvnas cifs vers=3.0,credentials=/etc/samba/.smbcreds,uid=34,gid=34,defaults 0 0

    These steps will ensure your SMB share is mounted and accessible in Proxmox Backup Server.

    Step 5: Configure Proxmox Backup Server

    1. Initial Setup:
      • Login: Use the root credentials to log in.
      • Network Configuration: Ensure the network settings are correct.
    2. Create a Datastore:
      • Navigate to Datastore: In the PBS web interface, go to Datastore and create a new datastore.
      • Path: Specify the path where backups will be stored.

    Step 6: Add Proxmox Backup Server to Proxmox VE

    Add Storage in PVE
      • Navigate to Datacenter: In the Proxmox web interface, go to Datacenter > Storage.
      • Add Storage: Click on Add and select Proxmox Backup Server.
      • Configuration: Enter the PBS ID pbs-main, PBS IP , username (root@pam), password, and datastore namepbs-main.
      • Fingerprint: Paste the PBS fingerprint here (to get it: go to Proxmox Backup Server, under Configuration -> Certificates -> View Certificate , copy the Fingerprint)
    Copy the Fingerprint of Proxmox Backup Server

    Step 7: Configure Backup Jobs

    1. Create Backup Jobs:
      • Navigate to Datacenter: In the Proxmox web interface, go to Datacenter > Backup.
      • Add a New Job: Click on Add and configure the backup job.
      • Storage: choose the PBS storage created in the previous step: pbs-main
      • Schedule: Set the schedule for the backups.
      • Selection: Choose the VMs and LXC containers to back up.

    Step 9: Verify and Monitor Backups

    1. Run a Test Backup: Manually trigger a backup job to ensure everything is working correctly.
    2. Monitor Backups: Use the PBS web interface to monitor backup status and logs.

    By following these steps, you can efficiently set up a Proxmox Backup Server as a VM within Proxmox and configure it to back up your VMs and LXC containers to a NAS. This setup ensures that your data is securely backed up and easily recoverable in case of any issues.

    Feel free to ask if you have any questions or need further assistance!

  • Step-by-Step Guide to Install OpenMediaVault on Proxmox and Enabling SMB Share

    Step-by-Step Guide to Install OpenMediaVault on Proxmox and Enabling SMB Share

    In the realm of home servers and virtualization, having a reliable platform to manage storage and network services is crucial. OpenMediaVault (OMV) and Proxmox Virtual Environment are two powerful tools that, when combined, create a robust environment for managing storage and virtual machines (VMs).

    OpenMediaVault represents the latest in network-attached storage (NAS) solutions, built upon Debian Linux. It comes pre-loaded with essential services such as SSH, (S)FTP, NFS, SMB/CIFS, RSync, and more, all readily accessible. Its modular framework allows for seamless expansion through plugins. While initially tailored for small offices or home offices, OpenMediaVault’s versatility extends beyond these environments. It offers a straightforward, user-friendly setup, making it accessible to anyone looking to install and manage NAS without extensive technical expertise.

    In this guide, we’ll walk through the process of installing OpenMediaVault on Proxmox and setting up an SMB share for easy file sharing across your network.

    Step 1: Download OpenMediaVault Installation ISO and Upload to Proxmox

    Before you begin setting up Proxmox Virtual Environment, you’ll need to acquire the OpenMediaVault installation ISO and make it available for deployment on your Proxmox server. Here’s how to get started:

    1. Download OpenMediaVault ISO: Visit the OpenMediaVault official download page to obtain the latest installation ISO. Choose the appropriate version depending on your hardware and requirements.
    2. Upload ISO to Proxmox: Access the Proxmox web interface using your browser. Navigate to “Storage” on the left sidebar and select the storage location where you want to upload the ISO file (e.g., local storage, NFS, or other storage types configured on Proxmox).
    3. Upload ISO File: Click on “Upload” and select the OpenMediaVault ISO file from your local machine. Wait for the upload to complete, ensuring the ISO is available in your chosen storage location within Proxmox.

    Step 2: Create a Virtual Machine for OpenMediaVault

    1. Login to Proxmox: Access the Proxmox web interface using your browser by navigating to the IP address of your Proxmox server.
    2. Create New VM: Click on “Create VM” and follow the wizard to set up a new virtual machine for OpenMediaVault.
      • Choose “Linux” and “Debian” as the OS type and version respectively.
      • For the OS: select OMV ISO to the VM’s CD/DVD drive to boot from it.
      • Allocate sufficient resources (CPU cores, RAM, disk space) based on your anticipated usage. In my case, I set the CPU cores to 1; RAM is 2048 MB; disk space is 128GB.
    3. Storage Configuration: Attach the addition hard disks or USB to use as storage. In my case, because I install OMV as a VM inside Proxmox on a mini PC, I just add an USB disk enclosure with 1TB laptop HDD.
    4. Networking: Assign network settings to the VM so it can connect to your network.
    5. Start the VM: Once configured, start the VM and proceed with the OMV installation.

    Step 3: Install OpenMediaVault

    1. Install OpenMediaVault:
      1. Once the OMV installer boots up, select your preferred language and proceed with the installation process.
      2. Follow the on-screen prompts to configure network settings, timezone, and partitioning options.
    2. Access Web Interface: Once installed, access OMV’s web interface by navigating to the VM’s IP address on port 80 (http://<ip_address>).
    OpenMediaVault dashboard

    Step 4: Configure OpenMediaVault

    1. Initial Setup: Log in using the default credentials (admin / openmediavault) and change the password if needed.
    2. Network: Go to Network -> Interface to set OMV to static IP address. I recommend setup OMV to use static IP using your modem LAN configuration.
    3. Storage:
      1. Navigate to “Storage” -> “Disks”, select the disk to use and click Wipe to delete the entire disk if needed. Be careful because this all the data on this disk will be lost.
      2. Navigate to “Storage” -> “File Systems” -> “Create” to create a new file system on your storage devices. Wait for the process to finish then the screen automatically change to Mount screen. Just choose the created filesystem and Type (I choose EXT4 for Type), then click Save -> Apply.
    4. Share Folders: Go to “Shared Folders” and create a new shared folder. Set permissions and other settings as needed (I just use the default settings and permissions).

    Step 5: Enable SMB/CIFS Share

    1. Configure SMB/CIFS: Go to “Services” -> “SMB/CIFS” -> “Settings” and enable the service.
    2. Configure the share: Go to “Services” -> “SMB/CIFS” -> “Shares” and add the previously created shared folder.
    3. Set Permissions: Adjust permissions and access rights under the “Access Rights Management” tab within SMB/CIFS settings.

    Step 6: Create a new user

    Go to “Users” -> “Users” to create a new user.

    Step 7: Access and Test the SMB Share

    1. Access the Share: On your networked devices (Windows, macOS, Linux), navigate to \<OMV_IP_address>\ to access the SMB share. Log in using the credentials you set up in the SMB/CIFS settings (or using the user created in Step 6).
    2. Test File Transfer: Transfer a file to and from the SMB share to ensure everything is functioning correctly.

    Conclusion

    Setting up OpenMediaVault on Proxmox and configuring an SMB share provides a versatile solution for managing storage and sharing files across your network. By following these steps, you can create a stable and efficient home server environment that meets your storage and file-sharing needs. Experiment further with additional plugins and features offered by OpenMediaVault to customize your setup even more. Enjoy your newly configured home server and the flexibility it brings to your network!

  • How to add NFS share from Synology DSM to backup Proxmox virtual machine

    How to add NFS share from Synology DSM to backup Proxmox virtual machine

    To set up an NFS share from a Synology DSM (DiskStation Manager) and use it to back up a Proxmox virtual machine (VM), you’ll need to follow a series of steps. Here’s a detailed, step-by-step guide to help you through the process:

    1. Set Up NFS Share on Synology DSM

    1.1. Log into Synology DSM

    • Open a web browser and log into your Synology DSM interface using your administrator credentials.

    1.2. Open Control Panel

    • Go to the Control Panel from the main menu.

    1.3. Configure NFS

    • Navigate to File Services.
    • Under the File Services tab, click on NFS and enable NFS by checking the appropriate box. Click Apply if prompted.
    Enable NFS service in Synology DSM

    1.4. Create a Shared Folder

    • Go to Shared Folder under File Services.
    • Click Create to set up a new shared folder. Follow the wizard to define the folder name, location, and permissions.
    Create shared folder to use as NFS for Proxmox
    • Configure the shared folder quota if you want to limit backup capacity
    Config shared folder quota

    1.5. Configure NFS Permissions

    • After creating the shared folder, select it from the list and click Edit.
    • Go to the Permissions tab, and then click on NFS Permissions.
    • Click Create to add a new NFS rule.
    • In the NFS rule setup, specify the following:
      • Hostname or IP: Enter the IP address of your Proxmox server or use * for all.
      • Privilege: Set to Read/Write (or Read-only if you only need read access).
      • Squash: Select the appropriate option (usually Map all users to admin). If you do not select ‘Map all users to admin’ for the Squash option, you will encounter a ‘Permission’ error when backing up LXC containers on Proxmox.
      • Security: Configure as needed (default is often sufficient).
    • Click OK to apply the settings.
    Config NFS Permissions

    2. Mount the NFS Share on Proxmox

    2.1. Log into Proxmox Web Interface

    • Open your web browser and log into the Proxmox VE web interface.

    2.2. Access Node Configuration

    • Select the Proxmox node where you want to mount the NFS share.
    • Go to the Datacenter view and then to the Storage tab.

    2.3. Add NFS Storage

    • Click Add and select NFS.
    • Fill in the NFS configuration details:
      • ID: Enter a unique name for the storage.
      • Server: Enter the IP address or hostname of your Synology NAS.
      • Export: Enter the path of the shared folder created on Synology (e.g., /volume2/proxmox).
      • Content: Check the boxes for the types of content you want to store (e.g., VZDump backup file).
      • Nodes: Select the nodes that should have access to this storage.
    • Click Add to save the configuration.
    NFS configuration details

    3. Configure Backup Job

    3.1. Go to Proxmox Backup Configuration

    • In the Proxmox web interface, navigate to Datacenter and then to Backup.

    3.2. Create a Backup Job

    • Click Add to create a new backup job.
    • Configure the job settings:
      • ID: Enter a name for the backup job.
      • Storage: Select the NFS storage you configured earlier.
      • Schedule: Set the schedule for automatic backups.
      • Compression: Choose the compression method if required.
      • Retention: Configure how long backups should be retained.

    3.3. Specify VM and Backup Options

    • Choose the VMs to be backed up.
    • Configure additional options as needed, such as backup mode (snapshot, stop, or suspend).

    4. Verify and Monitor

    4.1. Run Backup Job Manually

    • To test the configuration, you can run the backup job manually from the backup configuration screen.

    4.2. Monitor Backup Jobs

    • Check the status of backup jobs and ensure that they are running successfully.
    • Monitor logs and storage space to ensure everything is working as expected.

    Troubleshooting

    • Connection Issues: Ensure that the Proxmox server can reach the Synology NAS over the network and that there are no firewall rules blocking NFS traffic.
    • Permissions Issues: Double-check NFS permissions on the Synology DSM and ensure that the Proxmox server IP has the correct access rights.

    By following these steps, you should be able to successfully set up an NFS share on Synology DSM and use it for backing up Proxmox virtual machines.