Installing Ubuntu Server VM on Proxmox: A Step-by-Step Guide
The process of installing Ubuntu Server on a Proxmox VM, covering everything from initial setup to post-installation configuration.


Setting up a virtual machine (VM) running Ubuntu Server on Proxmox VE can transform your homelab into a versatile and efficient environment for various applications. Proxmox VE is a powerful open-source virtualization platform that combines KVM for virtual machines and LXC for containers. This guide will walk you through the process of installing Ubuntu Server on a Proxmox VM, covering everything from initial setup to post-installation configuration.
Why Use Proxmox VE and Ubuntu Server?
Proxmox VE:
- Flexible Virtualization: Supports both KVM for full virtualization and LXC for lightweight container-based virtualization.
- Easy Management: Provides a web-based interface for easy management of your virtual environment.
- Scalable: Suitable for both small home labs and large production environments.
Ubuntu Server:
- Stability and Support: Offers a stable and well-supported server operating system.
- Ease of Use: Known for its user-friendly setup and strong community support.
- Versatility: Ideal for a wide range of applications from web hosting to development environments.
Prerequisites
Before you begin, ensure you have the following:
- Proxmox VE Installed: Ensure Proxmox VE is installed and running on your server. If you need to install it, follow the Proxmox installation guide.
- Ubuntu Server ISO Image: Download the latest Ubuntu Server ISO from the official Ubuntu website.
- Storage Space: Ensure you have enough storage available on your Proxmox host for the VM and its data.
- Network Configuration: Make sure your Proxmox host is connected to the network and has internet access for downloading updates and packages.
Step-by-Step Installation Guide
1. Upload the Ubuntu Server ISO to Proxmox
- Access Proxmox Web Interface:
- Open your web browser and navigate to the Proxmox VE web interface. This is typically accessible at
https://<your-proxmox-ip>:8006.
- Open your web browser and navigate to the Proxmox VE web interface. This is typically accessible at
- Login:
- Enter your Proxmox username and password to log in.
- Upload the ISO:
- Go to the “Datacenter” view in the left-hand menu.
- Select your Proxmox node and then click on the “Local” storage under “Storage” in the left-hand menu.
- Click the “Content” tab and then click “Upload.”
- Choose “ISO Image” as the type, browse to the Ubuntu Server ISO file you downloaded, and upload it.
2. Create a New Virtual Machine
- Start the VM Creation Wizard:
- Click on “Create VM” in the top right corner of the Proxmox web interface.
- Configure VM Settings:
- General Tab:
- Node: Select the Proxmox node where you want to create the VM.
- VM ID: Proxmox will assign a default ID, but you can change it if needed.
- Name: Give your VM a meaningful name (e.g., “Ubuntu-Server”).
- OS Tab:
- ISO Image: Select the Ubuntu Server ISO image you uploaded earlier.
- Guest OS Type: Choose “Linux” and “5.x/6.x/7.x/8.x” as the version, which is suitable for Ubuntu Server.
- System Tab:
- BIOS: Choose “OVMF (UEFI)” or “SeaBIOS” depending on your preference. “SeaBIOS” is generally suitable for most setups.
- Machine: Select “i440fx” or “q35” (use “i440fx” for compatibility).
- Qemu Agent: Enabled.
- Disks Tab:
- Bus/Device: Choose “SCSI” or “IDE” for the disk bus. “SCSI” is recommended for better performance.
- Disk Size: Allocate sufficient disk space for your needs (e.g., 32 GB).
- Discard: enable this option if you use SSD.
- SSD Emulation: enable this option if you use SSD.
- CPU Tab:
- Sockets: Allocate the number of CPU sockets (e.g., 1).
- Cores: Specify the number of cores per socket (e.g., 2).
- Memory Tab:
- Memory Size: Allocate RAM for the VM (e.g., 2048 MB).
- Network Tab:
- Model: Choose “virtio” for better performance.
- Bridge: Select the network bridge (e.g., “vmbr0”) to connect the VM to your network.
- General Tab:
- Confirm and Create VM: Review your settings and click “Finish” to create the VM.
3. Install Ubuntu Server on the VM
Start the VM:
- Select your newly created VM from the Proxmox web interface.
- Click the “Start” button to boot up the VM.
Open the Console: Click on the “Console” tab to access the VM’s display and interact with it.
Begin Installation: The VM should boot from the Ubuntu Server ISO. Follow the on-screen instructions to start the installation process.
Choose Language and Keyboard Layout: Select your preferred language and keyboard layout.
Network Configuration:
- Automatic: The installer will automatically configure the network.
- Manual: If you need static IP settings, choose “Manual” and enter your network details.
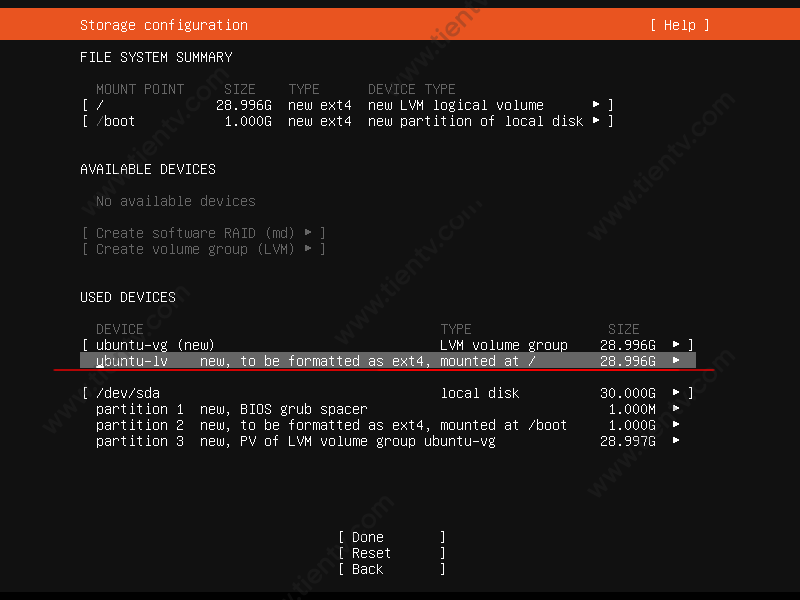
Configure Storage: Choose “Guided - Use Entire Disk” to let Ubuntu automatically partition the disk. Remember to adjust the ubuntu-lv line as below to make sure that Ubuntu Server will be installed into the entire disk.
Set Up User: Create a user account and set a password.
Install Updates and Software: Choose to install OpenSSH server.
Install GRUB: When prompted, install the GRUB boot loader to the disk to enable the system to boot into Ubuntu Server.
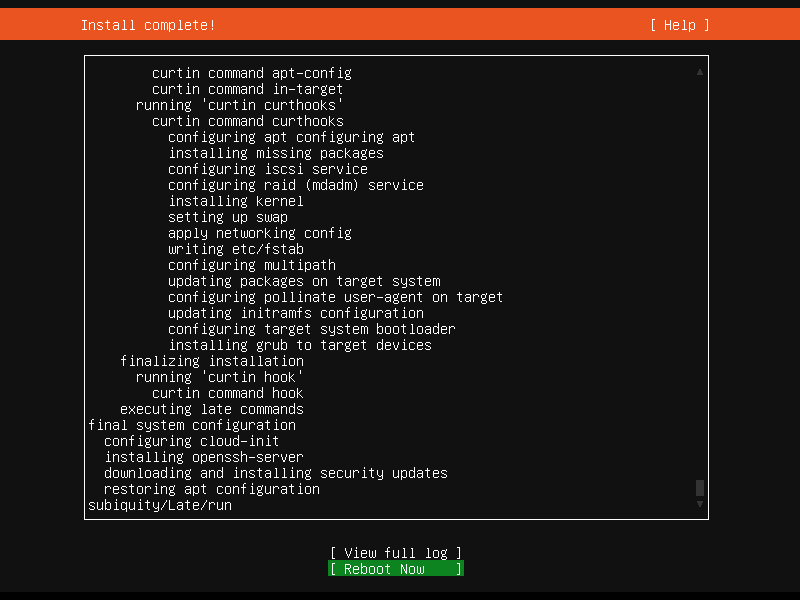
Complete Installation: Once installation is complete, the VM will prompt you to remove the ISO image and reboot. Do so, and your VM will boot into Ubuntu Server. On the first boot, remember to leave the system finish cloud-init initiating.
4. Post-Installation Configuration
Log in to your newly installed Ubuntu Server VM using the credentials you set up during installation. Then first update the system after installation:
sudo apt update && sudo apt dist-upgrade
Install QEMU Guest Agent:
sudo apt install qemu-guest-agent
Check QEMU Guest Agent installed:
systemctl status qemu-guest-agent.service
Start QEMU Guest Agent service:
sudo systemctl start qemu-guest-agent.service
Turn the system off:
sudo poweroff
Check the QEMU Guest Agent of the VM in enabled in Proxmox (if not -> enable it). Then start the VM, check the QEMU Guest Agent started successfully:
systemctl status qemu-guest-agent.service
Conclusion
You have successfully created and installed an Ubuntu Server VM on Proxmox VE. Your VM is now ready for further configuration and deployment of applications. Proxmox VE’s powerful management features will help you efficiently manage and scale your virtual environment, while Ubuntu Server provides a stable and versatile platform for your server needs.
If you encounter any issues or need further assistance, both the Proxmox and Ubuntu communities offer extensive resources and support. Enjoy your new virtual server and the endless possibilities it brings to your homelab!


